AWS PrivateLink
You can use AWS PrivateLink to provide connectivity between VPCs, AWS services, your on-premises systems, and ClickHouse Cloud without having your traffic go across the internet. This document describes how to connect to ClickHouse Cloud using AWS PrivateLink. To disable access to your ClickHouse Cloud services from addresses other than AWS PrivateLink addresses use ClickHouse Cloud IP Access Lists.
ClickHouse Cloud currently does not support cross-region PrivateLink. However, you can connect to PrivateLink using VPC peering. For more information and configuration guidance, please refer to AWS documentation.
AWS PrivateLink is only available in ClickHouse Cloud Production services. Development services are not supported. :::
Please complete the following steps to enable AWS Private Link:
- Obtain Endpoint Service name.
- Create a service endpoint.
- Add Endpoint ID to ClickHouse Cloud organization.
- Add Endpoint ID to service(s) allow list.
Find complete Terraform example for AWS Private Link here.
Prerequisites
Before you get started you will need:
- An AWS account.
- An API key with the necessary permissions to create and manage private links.
Steps
Follow these steps to connect your ClickHouse Cloud to your AWS PrivateLink.
Obtain Endpoint Service name
Option 1: ClickHouse Cloud console
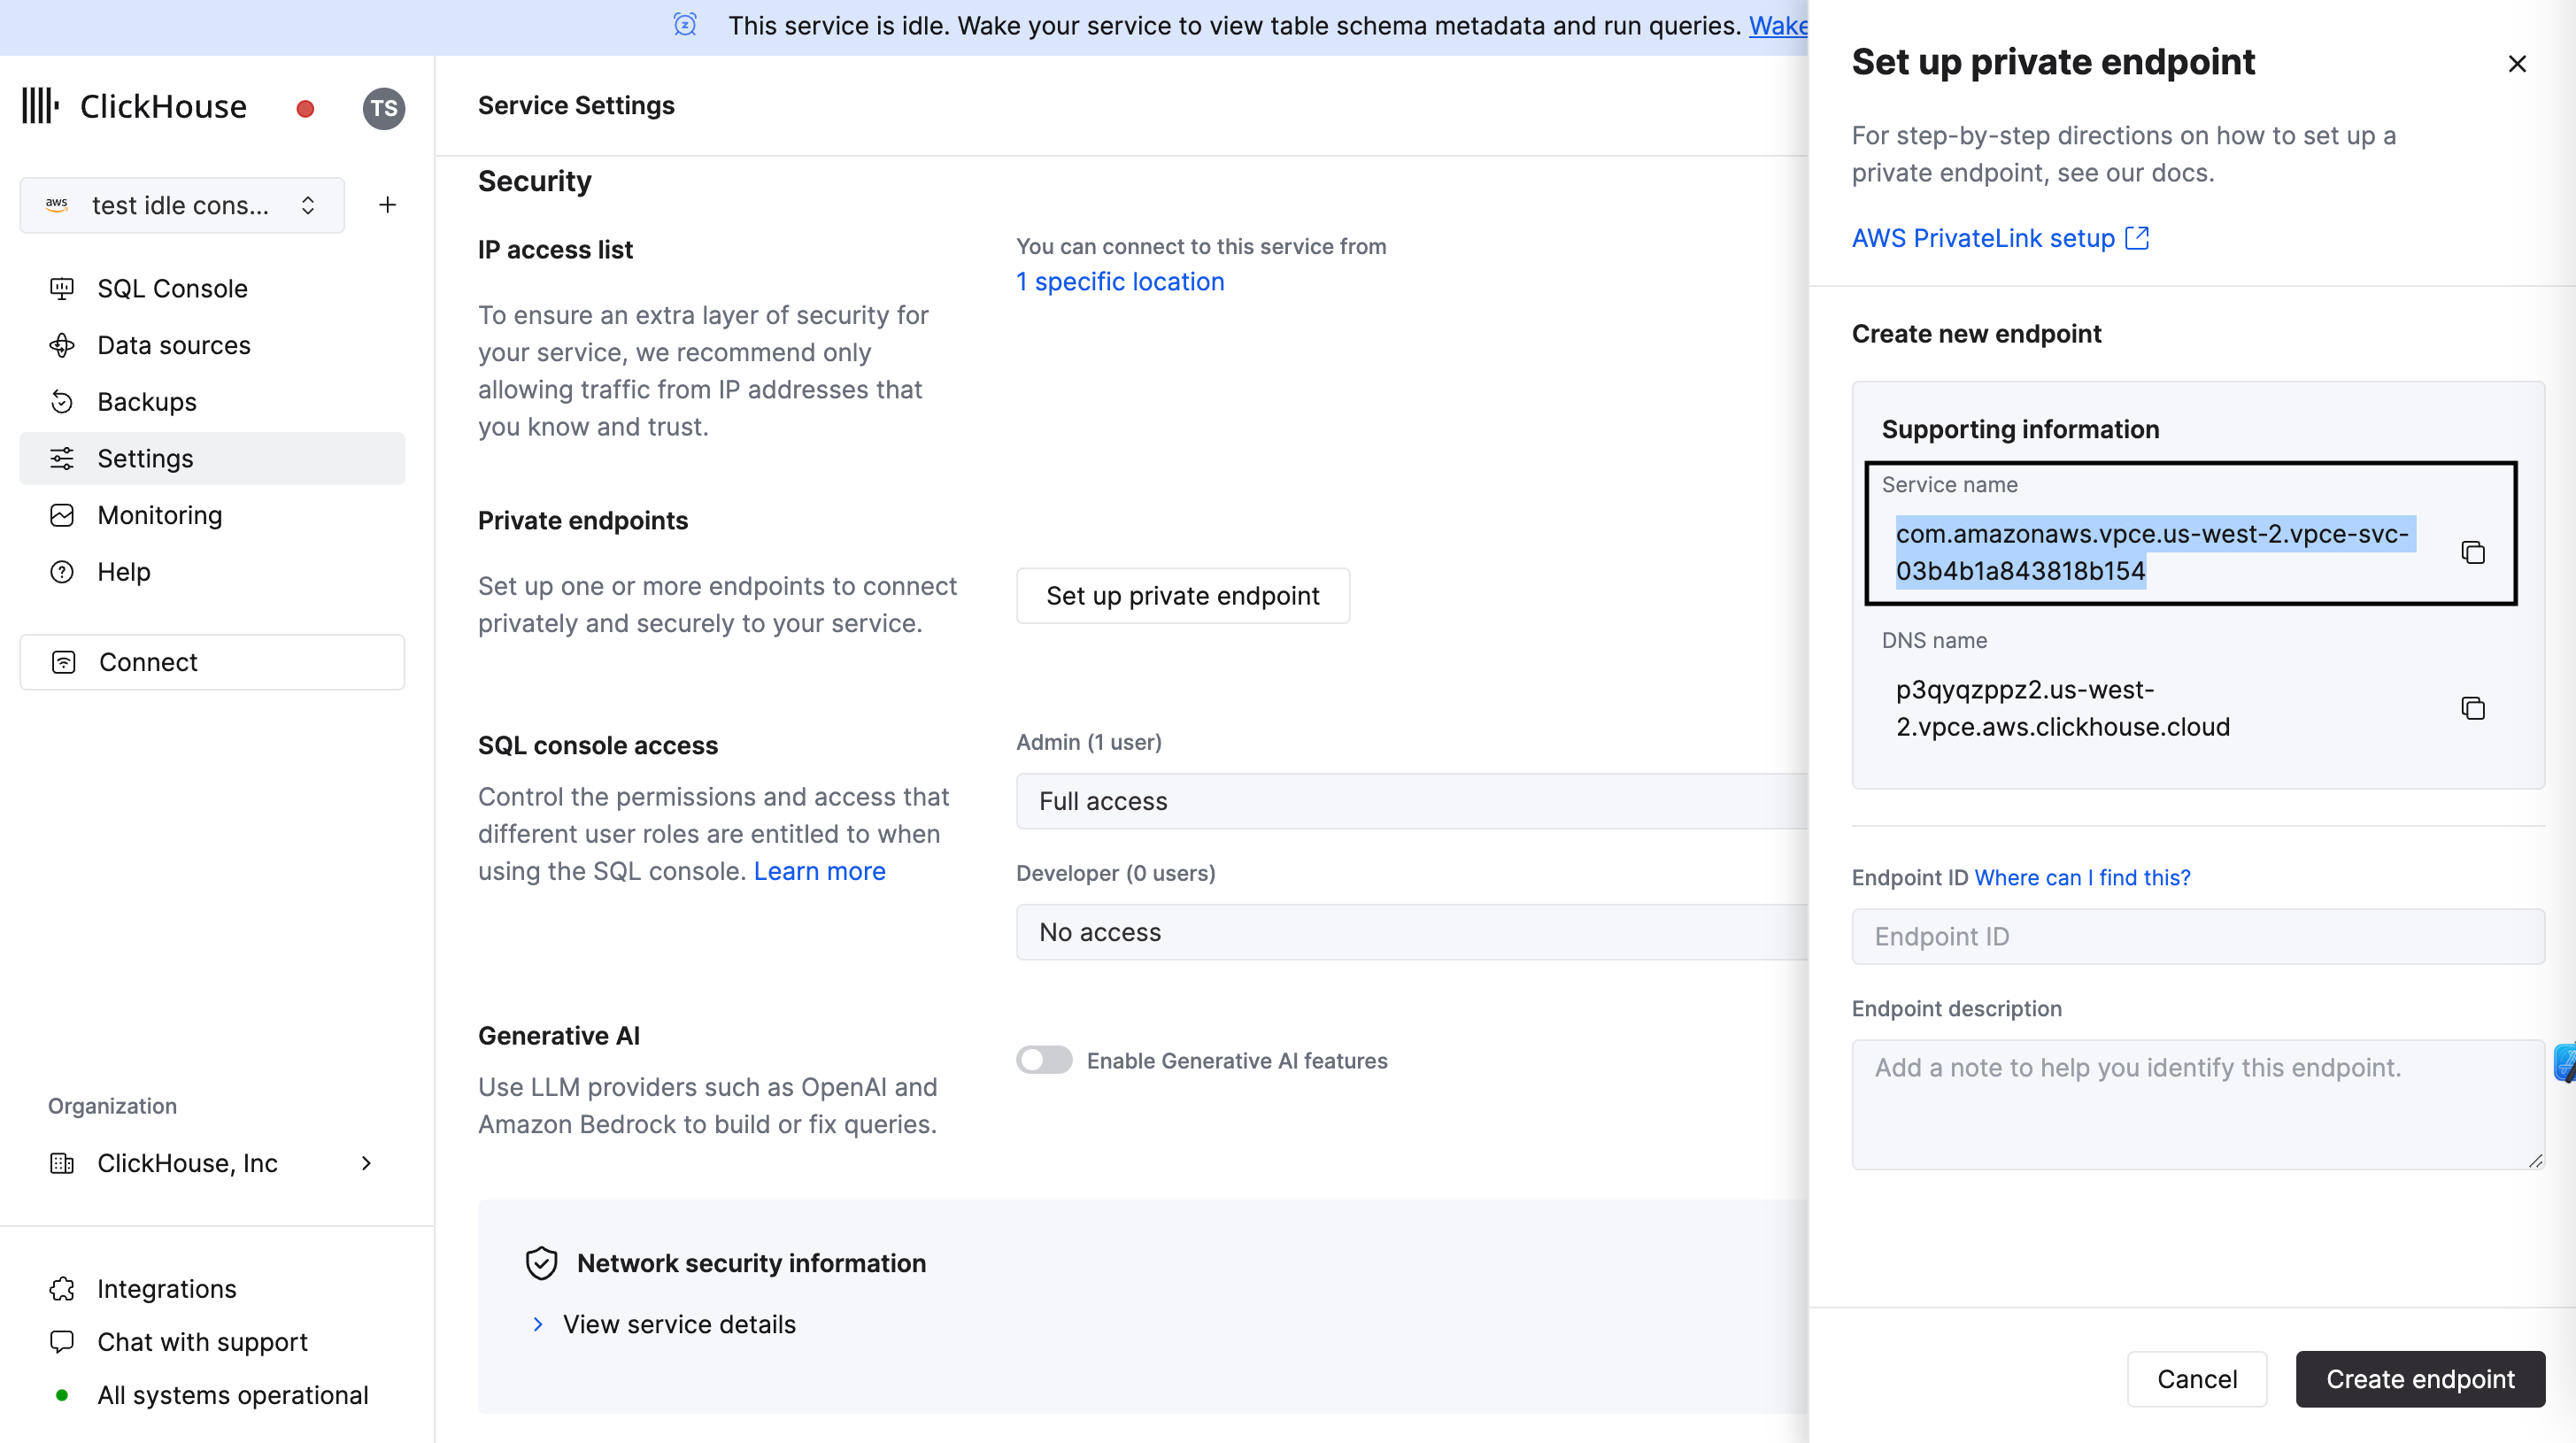
In the ClickHouse Cloud console, open the service that you would like to connect via PrivateLink, then open the Settings menu. Click on the Set up private endpoint button. Copy the Service name for which will be used for setting up Private Link.
Option 2: API
First, set the following environment variables before running any commands:
REGION=<Your region code using the AWS format>
PROVIDER=aws
KEY_ID=<Your key ID>
KEY_SECRET=<Your key secret>
ORG_ID=<Your ClickHouse organization ID>
SERVICE_NAME=<Your ClickHouse service name>
Get the desired instance ID by filtering by region, provider, and service name:
export INSTANCE_ID=$(curl --silent --user ${KEY_ID:?}:${KEY_SECRET:?} \
https://api.clickhouse.cloud/v1/organizations/$ORG_ID/services | \
jq ".result[] | select (.region==\"${REGION:?}\" and .provider==\"${PROVIDER:?}\" and .name==\"${SERVICE_NAME:?}\") | .id " -r)
Obtain an AWS Service Name for your Private Link configuration:
curl --silent --user ${KEY_ID:?}:${KEY_SECRET:?} \
https://api.clickhouse.cloud/v1/organizations/${ORG_ID:?}/services/${INSTANCE_ID:?}/privateEndpointConfig | \
jq .result
This command should return something like:
{
    ...
    "endpointServiceId": "com.amazonaws.vpce.yy-xxxx-N.vpce-svc-xxxxxxxxxxxx",
    ...
}
Make a note of the endpointServiceId and move onto step 2.
Create a service endpoint
Next, you need to create a service endpoint using the endpointServiceId from previous step.
Option 1: AWS console
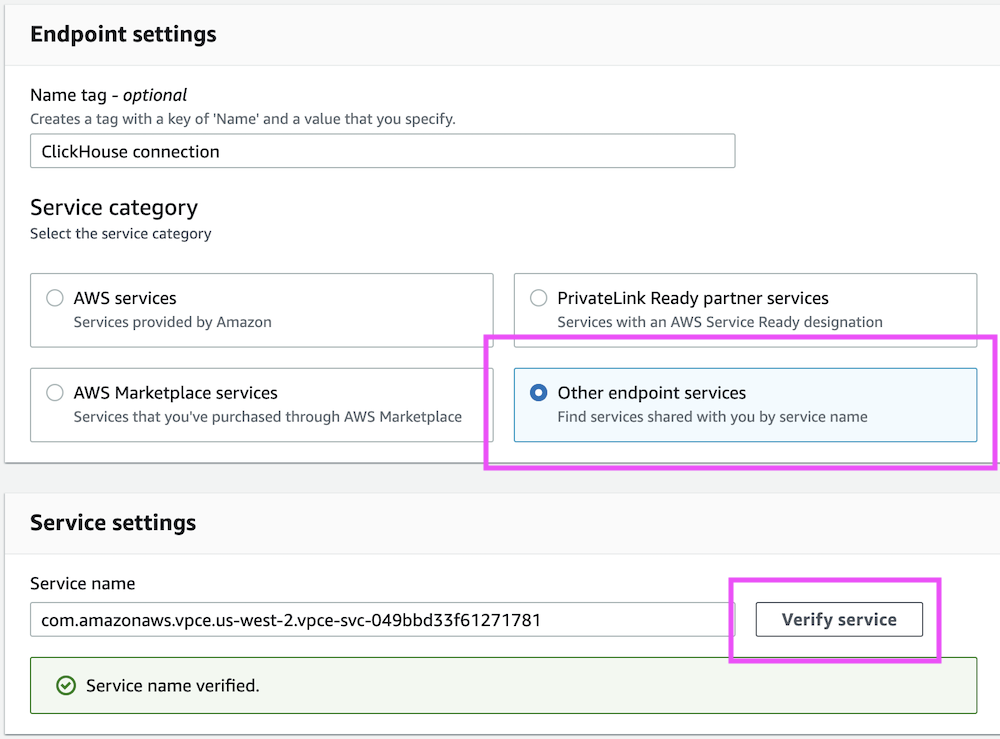
Open the the AWS console and Go to VPC → Endpoints → Create endpoints.
Select Other endpoint services and use the endpointServiceId you got from the previous step. Once you're done, click Verify service:
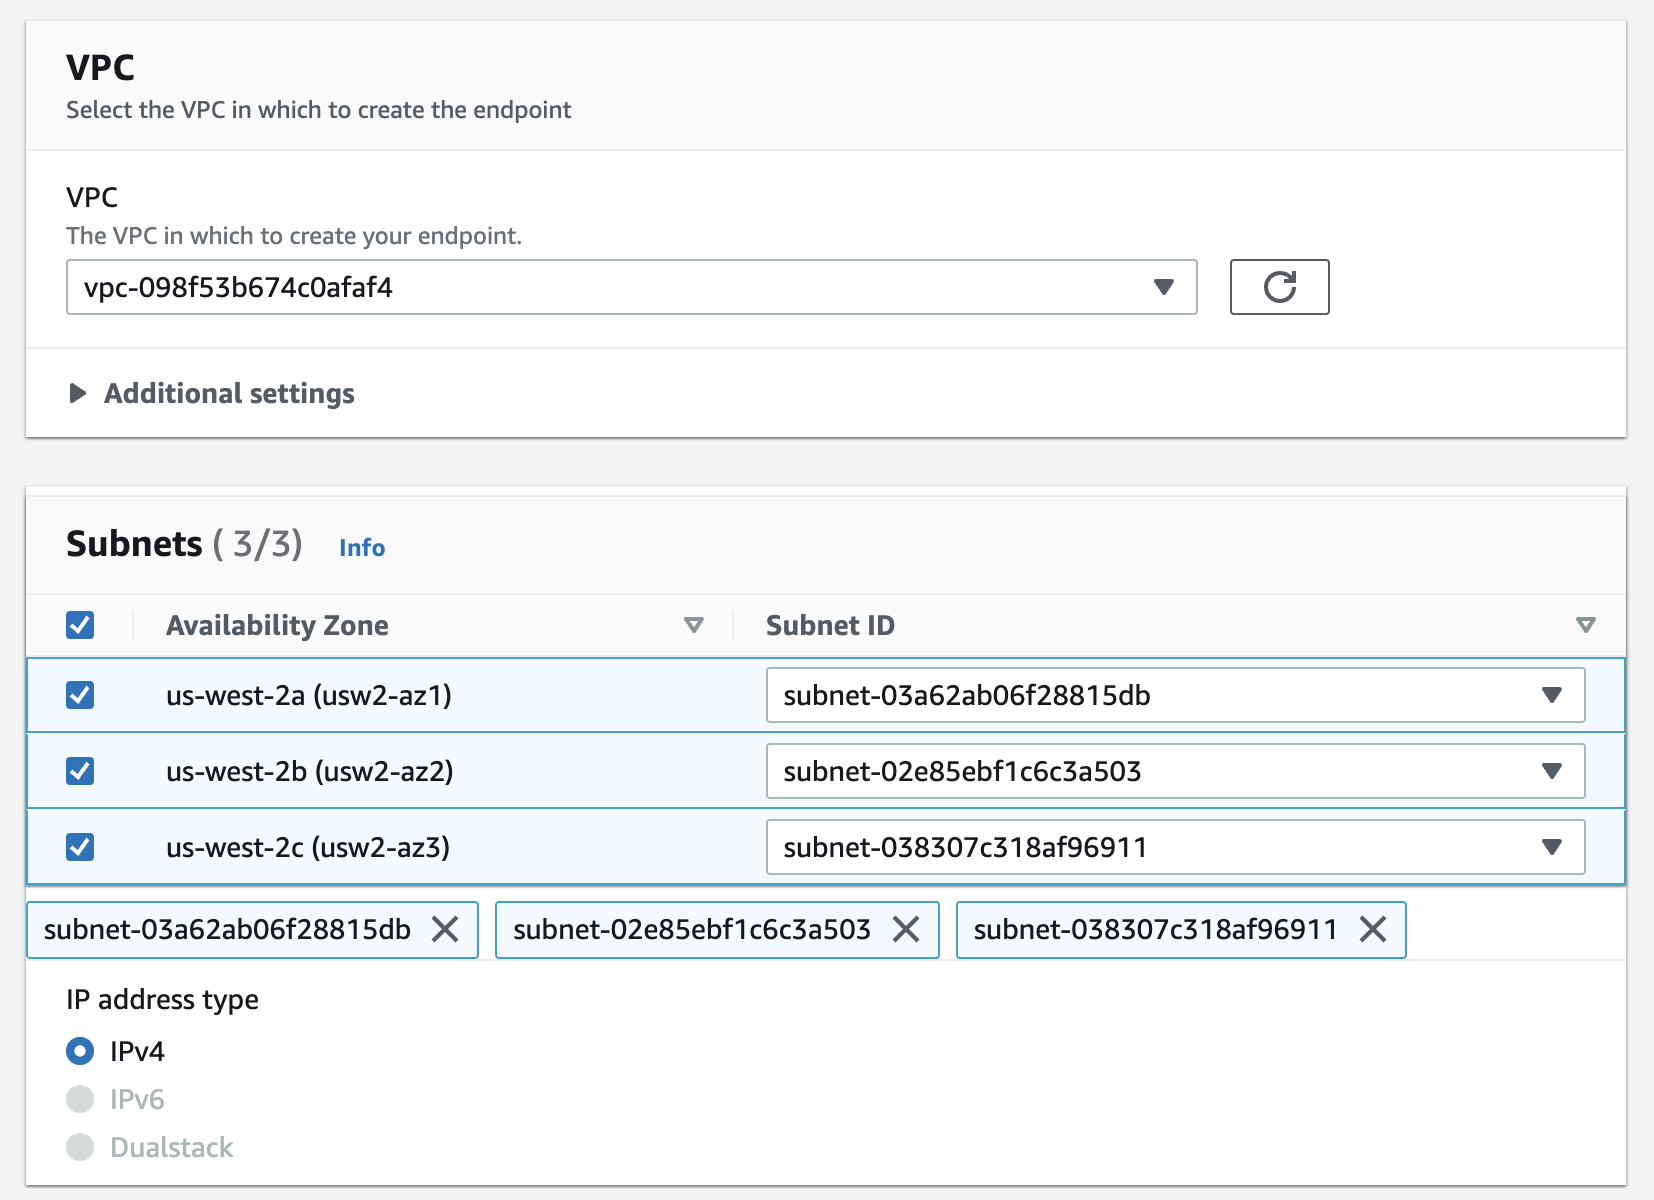
Next, select your VPC and subnets:
As an optional step, assign Security groups/Tags:
Make sure that ports 8443 and 9440 are allowed in the security group.
After creating the VPC Endpoint, make a note of the Endpoint ID value; you'll need it for an upcoming step.

Option 2: AWS CloudFormation
Make sure to use correct subnet IDs, security groups, and VPC ID.
Resources:
  ClickHouseInterfaceEndpoint:
    Type: 'AWS::EC2::VPCEndpoint'
    Properties:
      VpcEndpointType: Interface
      PrivateDnsEnabled: false
      ServiceName: <use endpointServiceId from 'Obtain AWS Service Name for Private Link' step>
      VpcId: vpc-vpc_id
      SubnetIds:
        - subnet-subnet_id1
        - subnet-subnet_id2
        - subnet-subnet_id3
      SecurityGroupIds:
        - sg-security_group_id1
        - sg-security_group_id2
        - sg-security_group_id3
Option 3: Terraform
resource "aws_vpc_endpoint" "this" {
  vpc_id            = var.vpc_id
  service_name      = "<use endpointServiceId from 'Obtain AWS Service Name for Private Link' step>"
  vpc_endpoint_type = "Interface"
  security_group_ids = [
    Var.security_group_id1,var.security_group_id2, var.security_group_id3,
  ]
  subnet_ids          = [var.subnet_id1,var.subnet_id2,var.subnet_id3]
  private_dns_enabled = false
}
Modify Private DNS Name for Endpoint
This step injects private DNS zone <region code>.vpce.aws.clickhouse.cloud configuration into AWS VPC.
If you use own DNS resolver, create a <region code>.vpce.aws.clickhouse.cloud DNS zone and point a wildcard record *.<region code>.vpce.aws.clickhouse.cloud to the Endpoint ID IP addresses.
Option 1: AWS Console
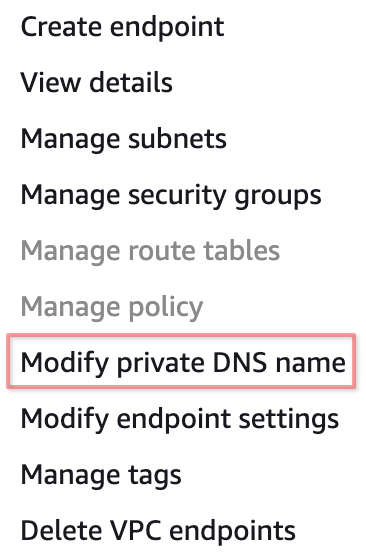
Navigate to VPC Endpoints, right click the VPC Endpoint, then select Modify private DNS name:
On the page that opens, select Enable private DNS names:

Option 2: AWS CloudFormation
Update the CloudFormation template and set PrivateDnsEnabled to true:
PrivateDnsEnabled: true
Apply the changes.
Option 3: Terraform
- Change the
aws_vpc_endpointresource in Terraform code and setprivate_dns_enabledtotrue:
private_dns_enabled = true
Apply the changes.
Add Endpoint ID to ClickHouse Cloud organization
Option 1: ClickHouse Cloud console
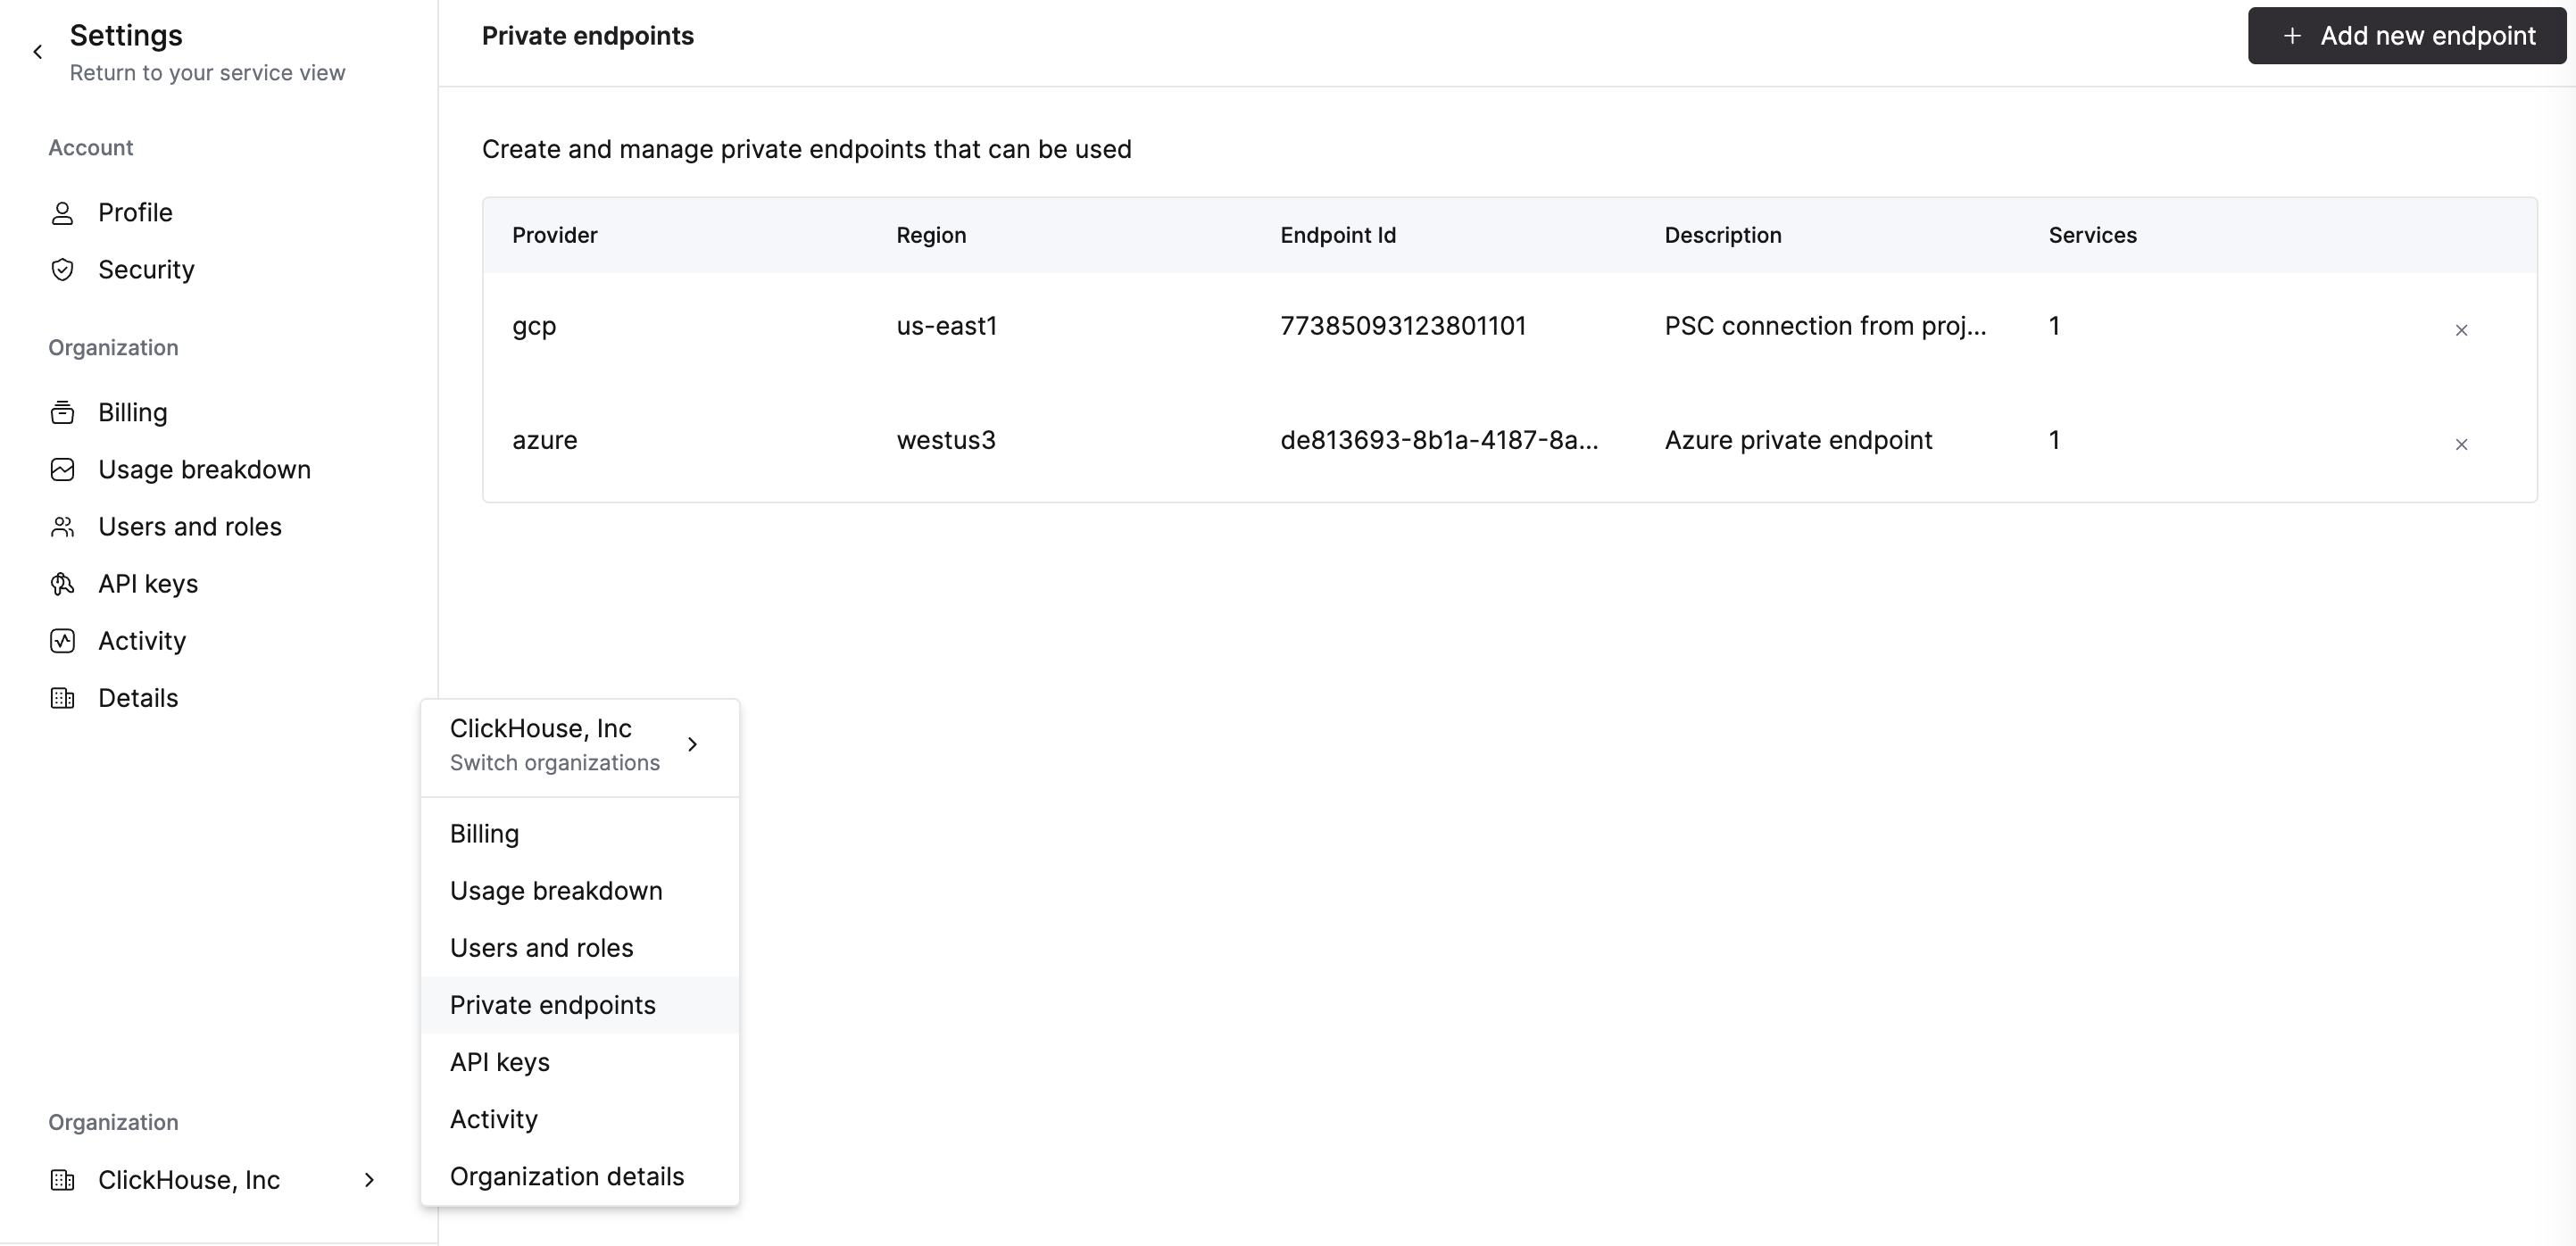
To add an endpoint to organization, proceed to the Add Endpoint ID to service(s) allow list step. Adding the Endpoint ID using the ClickHouse Cloud console to the services allow list automatically adds it to organization.
To remove an endpoint, open Organization details -> Private Endpoints and click the delete button to remove the endpoint.
Option 2: API
Set the following environment variables before running any commands:
PROVIDER=aws
KEY_ID=<Key ID>
KEY_SECRET=<Key secret>
ORG_ID=<please set ClickHouse organization ID>
ENDPOINT_ID=<Endpoint ID from previous step>
REGION=<region code, please use AWS format>
Set the VPC_ENDPOINT environment variable using data from the previous step.
To add an endpoint, run:
cat <<EOF | tee pl_config_org.json
{
  "privateEndpoints": {
    "add": [
      {
        "cloudProvider": "aws",
        "id": "${ENDPOINT_ID:?}",
        "description": "An aws private endpoint",
        "region": "${REGION:?}"
      }
    ]
  }
}
EOF

curl --silent --user ${KEY_ID:?}:${KEY_SECRET:?} \
-X PATCH -H "Content-Type: application/json" \
https://api.clickhouse.cloud/v1/organizations/${ORG_ID:?} \
-d @pl_config_org.json
To remove an endpoint, run:
cat <<EOF | tee pl_config_org.json
{
  "privateEndpoints": {
    "remove": [
      {
        "cloudProvider": "aws",
        "id": "${ENDPOINT_ID:?}",
        "region": "${REGION:?}"
      }
    ]
  }
}
EOF

curl --silent --user ${KEY_ID:?}:${KEY_SECRET:?} \
-X PATCH -H "Content-Type: application/json" \
https://api.clickhouse.cloud/v1/organizations/${ORG_ID:?} \
-d @pl_config_org.json
Add Endpoint ID to service(s) allow list
Option 1: ClickHouse Cloud console
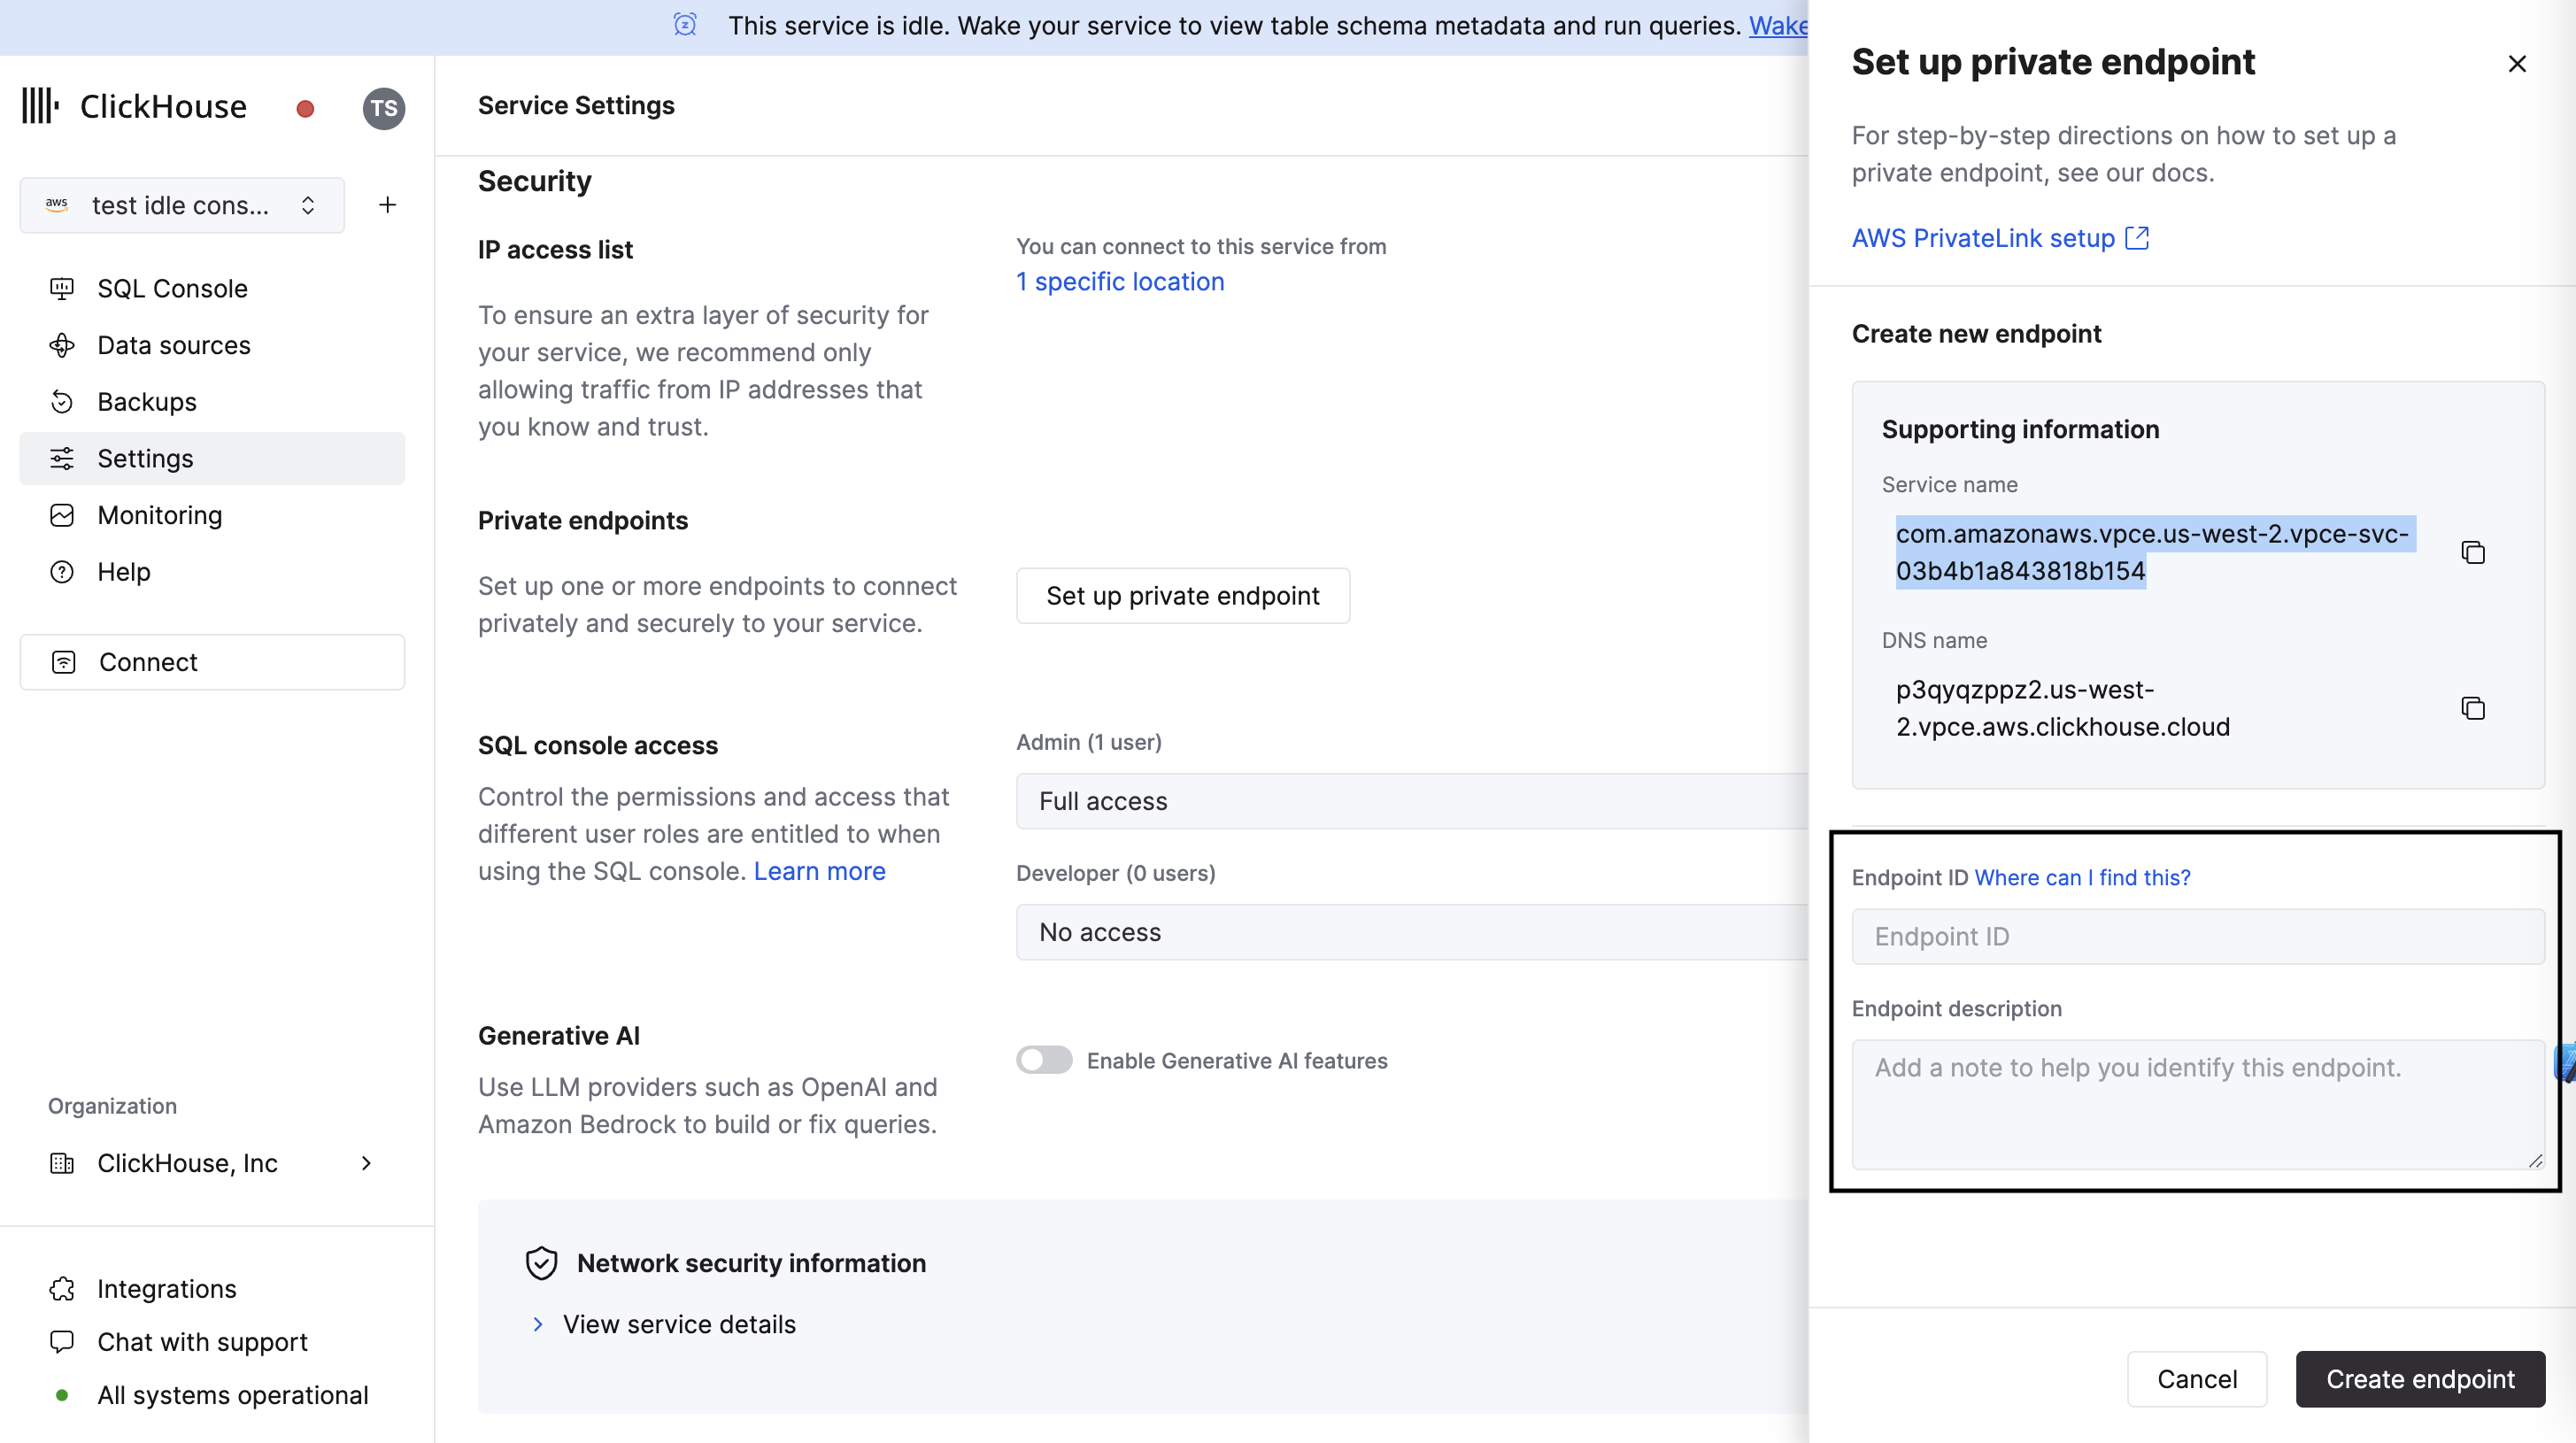
In the ClickHouse Cloud console, open the service that you would like to connect via PrivateLink then navigate to Settings. Enter the Endpoint ID obtained from the previous step.
If you want to allow access from an existing PrivateLink connection, use the existing endpoint drop-down menu.
Option 2: API
You need to add an Endpoint ID to the allow-list for each instance that should be available using PrivateLink.
Set the following environment variables before running any commands:
PROVIDER=aws
KEY_ID=<Key ID>
KEY_SECRET=<Key secret>
ORG_ID=<please set ClickHouse organization ID>
ENDPOINT_ID=<Endpoint ID from previous step>
INSTANCE_ID=<Instance ID>
To add an endpoint ID to an allow-list:
cat <<EOF | tee pl_config.json
{
  "privateEndpointIds": {
    "add": [
      "${ENDPOINT_ID:?}"
    ]
  }
}
EOF

curl --silent --user ${KEY_ID:?}:${KEY_SECRET:?} \
-X PATCH -H "Content-Type: application/json" \
https://api.clickhouse.cloud/v1/organizations/${ORG_ID:?}/services/${INSTANCE_ID:?} \
-d @pl_config.json | jq
To remove an endpoint ID from an allow-list:
cat <<EOF | tee pl_config.json
{
  "privateEndpointIds": {
    "remove": [
      "${ENDPOINT_ID:?}"
    ]
  }
}
EOF

curl --silent --user ${KEY_ID:?}:${KEY_SECRET:?} \
-X PATCH -H "Content-Type: application/json" \
https://api.clickhouse.cloud/v1/organizations/${ORG_ID:?}/services/${INSTANCE_ID:?} \
-d @pl_config.json | jq
Accessing an instance using PrivateLink
Each instance with configured a Private Link filter has a public and private endpoint. In order to connect to your service using PrivateLink you need to use the private endpoint privateDnsHostname.
The private DNS hostname is only available from your AWS VPC. Do not try to resolve a DNS host from a local machine.
Getting Private DNS Hostname
Option 1: ClickHouse Cloud console
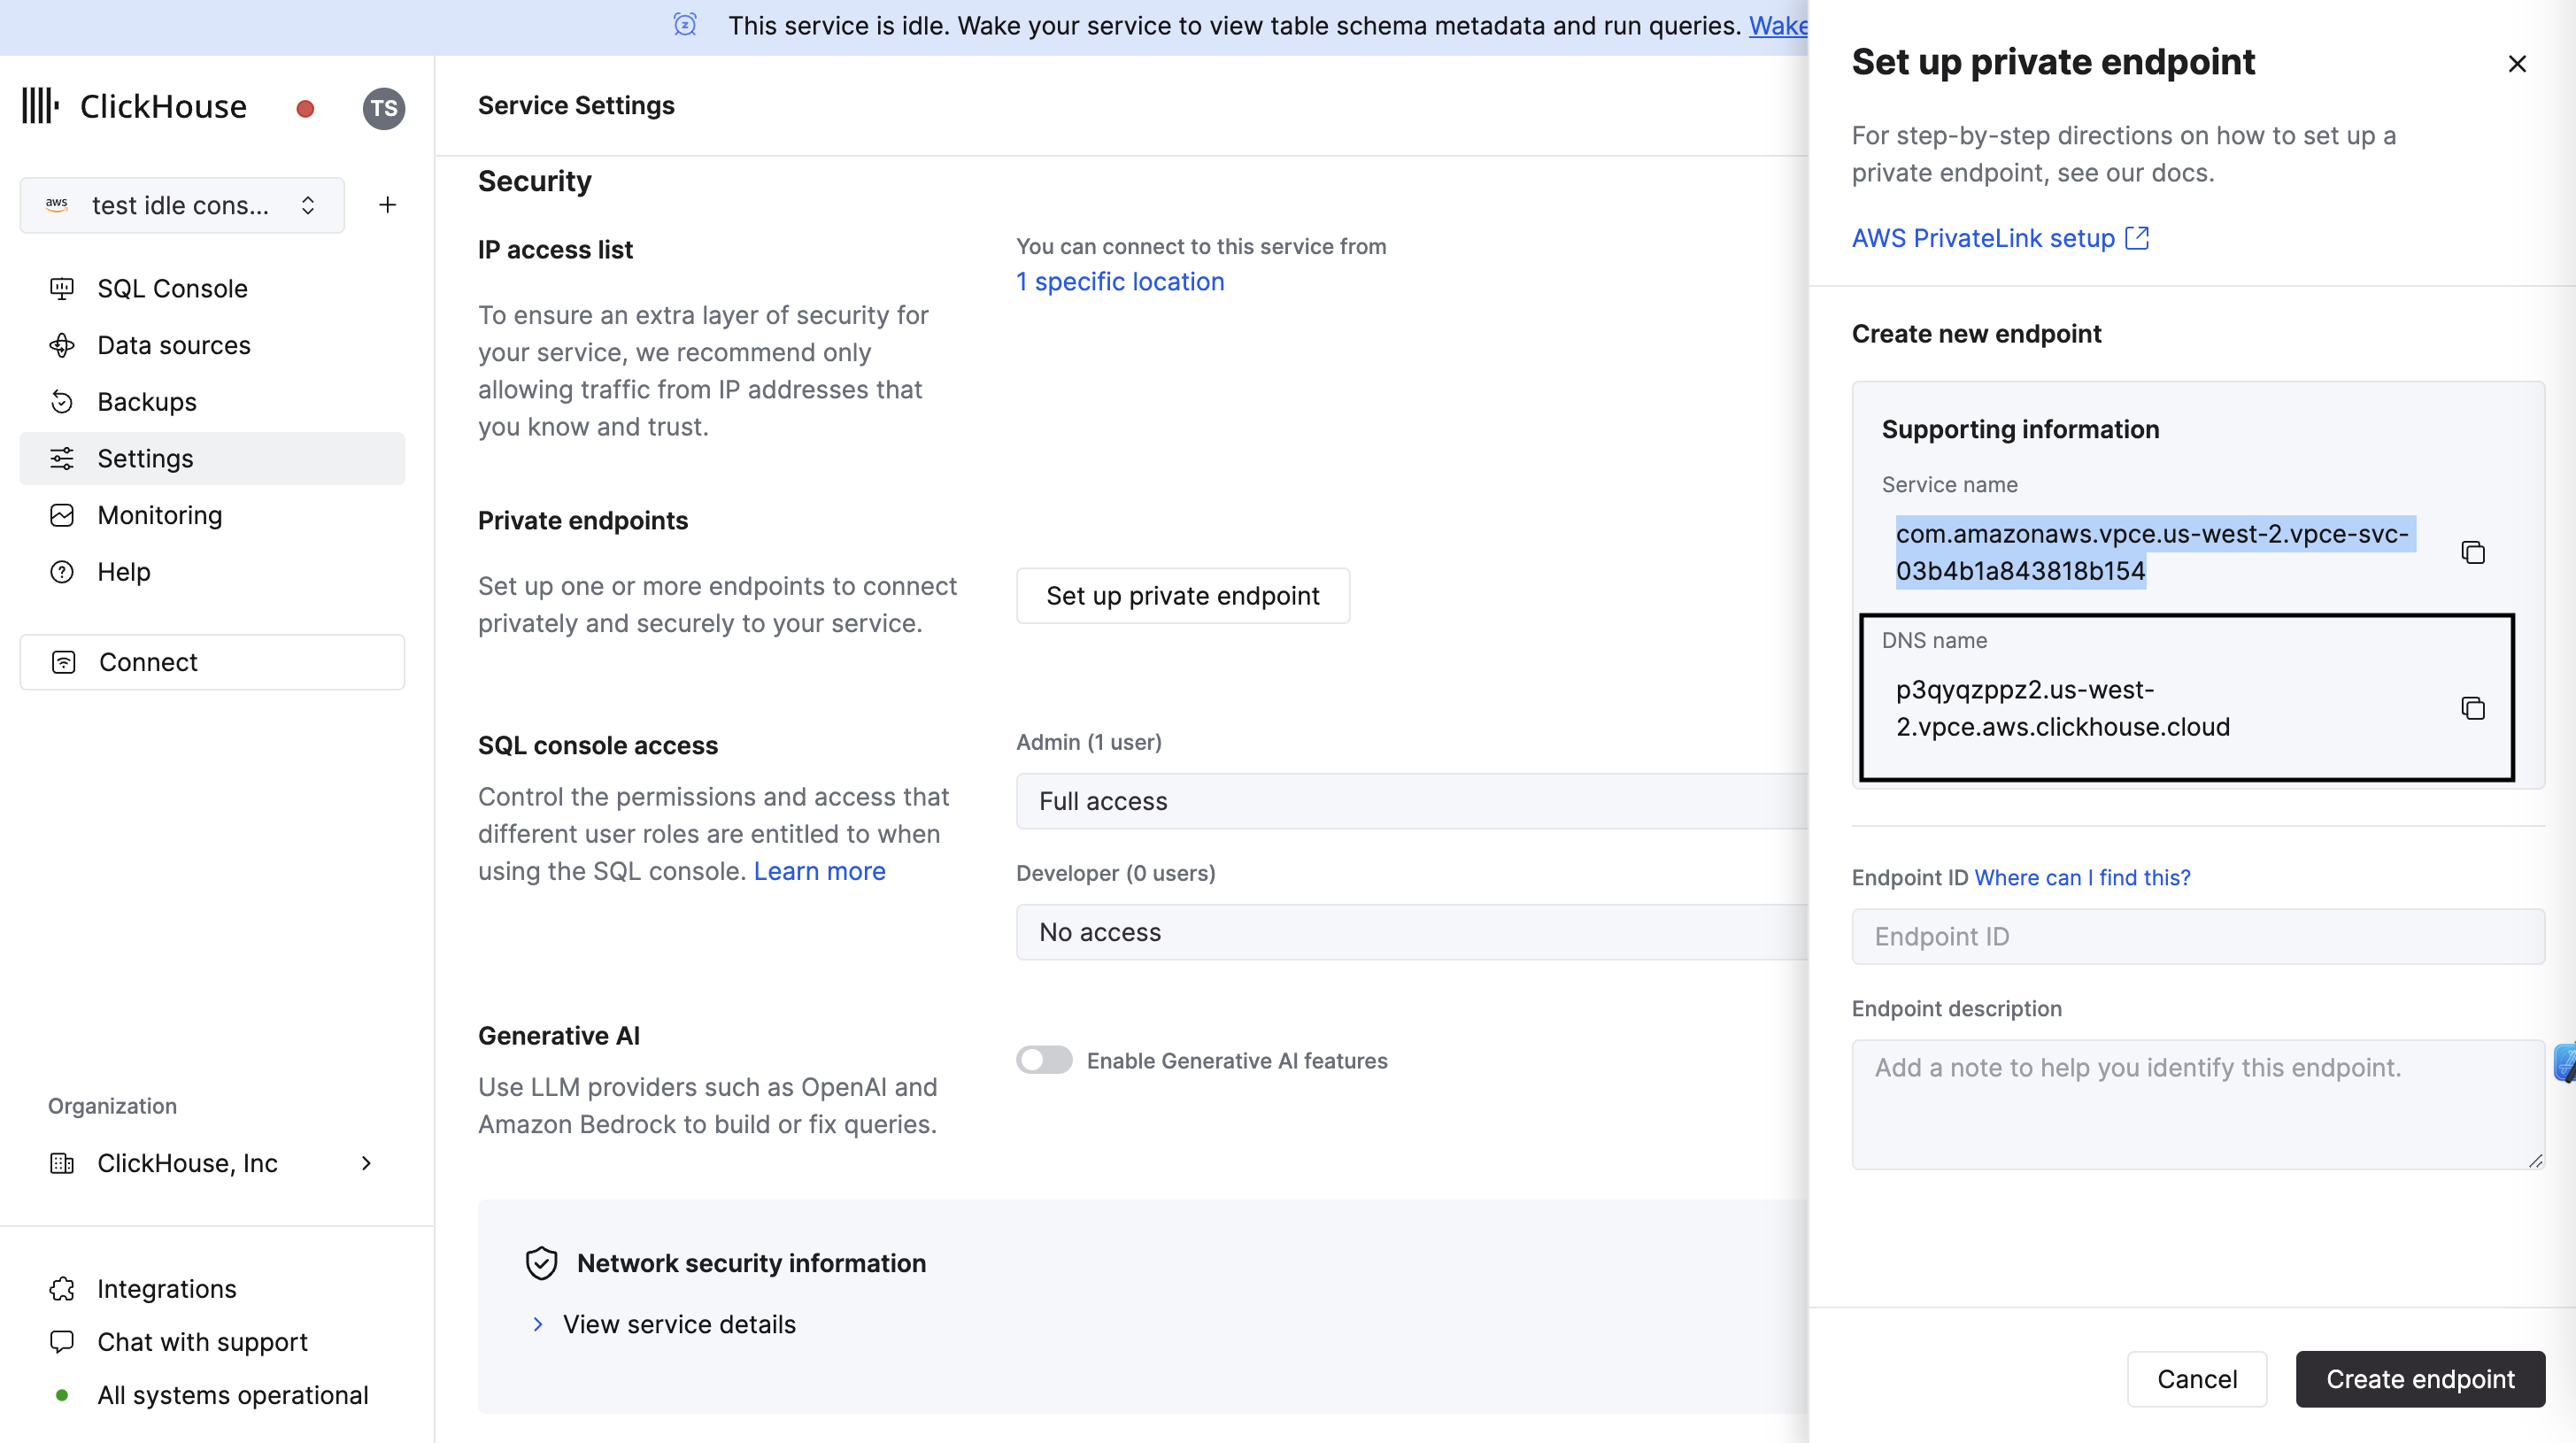
In the ClickHouse Cloud console, navigate to Settings. Click on the Set up private endpoint button. In the opened flyout, copy the DNS Name.
Option 2: API
Set the following environment variables before running any commands:
KEY_ID=<Key ID>
KEY_SECRET=<Key secret>
ORG_ID=<please set ClickHouse organization ID>
INSTANCE_ID=<Instance ID>
curl --silent --user ${KEY_ID:?}:${KEY_SECRET:?} \
https://api.clickhouse.cloud/v1/organizations/${ORG_ID:?}/services/${INSTANCE_ID:?}/privateEndpointConfig | \
jq .result
This should output something like:
{
  "endpointServiceId": "com.amazonaws.vpce.yy-xxxx-N.vpce-svc-xxxxxxxxxxxx",
  "privateDnsHostname": "xxxxxxx.yy-xxxx-N.vpce.aws.clickhouse.cloud"
}
In this example connection to xxxxxxx.yy-xxxx-N.vpce.aws.clickhouse.cloud host name will be routed to PrivateLink, but xxxxxxx.yy-xxxx-N.aws.clickhouse.cloud will be routed over the internet.
Troubleshooting
Multiple PrivateLinks in one region
In most cases, you only need to create a single endpoint service for each VPC. This endpoint can route requests from the VPC to multiple ClickHouse Cloud services.
Connection to private endpoint timed out
- Please attach security group to VPC Endpoint.
- Please verify
inboundrules on security group attached to Endpoint and allow ClickHouse ports. - Please verify
outboundrules on security group attached to VM which is used to connectivity test and allow connections to ClickHouse ports.
Private Hostname: Not found address of host
- Please check "Private DNS names" option is enabled, visit step for details
Connection reset by peer
- Most likely Endpoint ID was not added to service allow list, please visit step
Checking Endpoint filters
Set the following environment variables before running any commands:
KEY_ID=<Key ID>
KEY_SECRET=<Key secret>
ORG_ID=<please set ClickHouse organization ID>
INSTANCE_ID=<Instance ID>
curl --silent --user ${KEY_ID:?}:${KEY_SECRET:?} \
-X GET -H "Content-Type: application/json" \
https://api.clickhouse.cloud/v1/organizations/${ORG_ID:?}/services/${INSTANCE_ID:?} | \
jq .result.privateEndpointIds
Connecting to a remote database
Let's say you are trying to use the MySQL or PostgreSQL table functions in ClickHouse Cloud and connect to your database hosted in an Amazon Web Services (AWS) VPC. AWS PrivateLink cannot be used to enable this connection securely. PrivateLink is a one-way, unidirectional connection. It allows your internal network or Amazon VPC to connect securely to ClickHouse Cloud, but it does not allow ClickHouse Cloud to connect to your internal network.
According to the AWS PrivateLink documentation:
Use AWS PrivateLink when you have a client/server set up where you want to allow one or more consumer VPCs unidirectional access to a specific service or set of instances in the service provider VPC. Only the clients in the consumer VPC can initiate a connection to the service in the service provider VPC.
To do this, configure your AWS Security Groups to allow connections from ClickHouse Cloud to your internal/private database service. Check the default egress IP addresses for ClickHouse Cloud regions, along with the available static IP addresses.